Friday, November 27, 2009

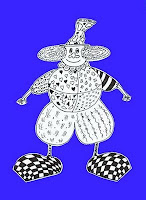
Second Grade Clown Drawings

This particular activity followed a series of lessons in the Monart Drawing Method. As the lesson progresses, I continually refer to the Monart basic shape families; Lines, Dots, and Circles. (see chart on right). The lesson idea came from Kinder Art.

(BTW, I will always try to show the source for lessons I share but in some cases I don't remember where I found the idea. Feedback in this area will be appreciated.)

I suppose there are many ways to approach this lesson. Here is my approach: One can use either an overhead projector, or a digital projector. I've used both. I demonstrate how to draw the clown (again, referring to the names of the shapes or lines I am using). I have found over the years that many students need that extra help when drawing. They either draw the images too small or too skinny or in some cases, say they can't draw at all. I model how to draw the clown but that isn't always necessary. However, I model only the basic parts (head, body, arms, and legs (shoes too)) and have them choose how to draw the hair, hat type (or no hat) and designs on the body. Some kids venture out on their own, others copy the details of the model. - Just as a side note, the technique for drawing the clown feet come from Mark Kistler's Draw Squad method.

After students complete their drawing (using pencil) I then have them outline their work with black marker followed by coloring with markers. For coloring this particular project, I have the students use a method I learned from one of the segments on the Donna Hugh Videos. (I'm pretty sure this is where I learned it but am not sure). The middle-school students use this same method and the art teacher calls it the Mr. Triplett Marker Method. Pretty cool.

The basic rule for coloring is that the students are to use all the colors on the color wheel. There can be no white left on the paper. I teach the kids that a marker is much like a paint brush. All the color is in the tip and that the students simply "paints" the color onto the paper. BUT, they are to keep their lines going in the same direction (for each individual section or shape). For example, when coloring the ground that the clown is standing on, choose either vertical or horizontal lines and lay one line of color down and then the next, and then the next, and so on. For shapes, outline the shape first, then choose the direction to color, and lay down one line at a time (don't go back and forth like one would with a color crayon or color pencil). Start at the top of the area to be colored, draw a line of color to the bottom, then start that exact process over again). You can see the technique in each of the clown drawings. For round objects I have the kids first outline the shape, and then color in a spiral following the round shape. I hope this explanation makes sense. Please ask if this doesn't make any sense.

After the pictures are completed, I have the students mount them and then they are displayed either in their rooms or outside the rooms. You can see student examples here.

In some activities of a similar kind, I have allowed for the backgrounds to be colored using colored pencils or crayons. Details are all colored in markers (using the above mentioned method) and backgrounds can be colored with crayon or pencils. It's a nice light background contrasted against the darker color of the markers.

What I like about activities like this one is that they gives me an opportunity to talk about design, overlapping, background, details, positioning, etc. Concepts about line and shape can be reinforced and principles such as repetition, patterning, balance, etc can also be introduced.

Thursday, November 26, 2009

Painting with tongue depressors and other stuff

I've been experimenting with a few painting techniques that I can teach to my students in preparation for the painting workshops I want to set up. I've gathered a bunch of different painting tools: tongue depressors, rulers, Popsicle sticks, combs, and an assortment of objects for making different shapes/lines, sponges, cardboard strips, and of course, paint brushes.

I found a picture on the Internet of cactus (google search) silhouetted against a sunset sky (image on the left-it's computer generated-Tuxpaint-it's free (see tuxpaint.org)). I'm trying to find techniques that kids can easily duplicate. The directions are simple: First, paint the yellow sun and then put down a line of red paint on the left side of the paper (I used a spoon). Add a few yellow and orange drops here and there on the paper and then using a tongue depressor, drag the paint from left to right. After that dries add the black foreground. I used acrylic black as the tempera tends to crack. The results are the image on the right.

I showed the picture to the kids to see what they thought of it. They thought it was pretty cool and then we moved on to the current lesson (see previous blog entry). On 4th grade student, Chris, painted his impression of the picture. Keep in mind that he only saw my example for about a minute. I was very impressed with his results.

Second graders were working with crayons (doing a crayon resist) and after seeing the 4th graders example (I was showing it off) one second grader decided to draw a similar picture.

Kids never cease to amaze me with their artwork. I can't wait to get the workshops all set up (am currently in the process of introducing color theory and having the kids combine colors to make their own secondary and intermediate colors. I'm also introducing the various techniques that can be used in the various workshop centers. I'll share some of the work (probably in January) that results from the creative craze I expect to see.

Happy Thanksgiving to all.

Sunday, November 22, 2009

Exploring Color

Last year someone gave me about 200 round vegetable trays. I had no idea how I would use them at the time, but as I began looking for a fun introductory lesson to color theory, I began to think about how to use those trays.

In the past I have used visuals (PowerPoint and color wheel) to show different color relationships. But I decided to start this year out by letting the kids just play with the primary colors and discover how many different color variations they could find.

To begin the activity, I set a few ground rules for behavior expectations (with an emphasis on cleanup behaviors). I gave a quick demonstration on how to use the trays and then laid out the procedures for acquiring materials and properly cleaning up at the end of class. Students were given a paint brush, tray, paper, water, and plenty of paper towel sheets. We used liquid tempera and I instructed the kids to put about 3-4 drops on three different sections on their tray (using only blue, yellow, and red). From there, the students used the remaining sections on the trays for mixing their colors. They were also asked to record their color discoveries on their blank paper.

As this was an exploration activity, the students could make "puddles" or "pictures." Most made puddles. All had fun.


Cleanup was a bit of a challenge. I have assigned specific tasks for table leaders (table leaders rotate each week) and then all student are responsible for the cleanup of their own tray and work area (including putting their work on the drying rack). Students wiped off the paint from the trays, and then used a spray bottle to add a bit of water and removed any remaining paint residue. Cleanup took about 8 minutes.

We have some basic cleanup rules: no wandering, clean your area and then help your table mates, put all materials back where they belong, sit at your table when you've finished your responsibilities. Only table leaders are allowed at the sink (I only have one sink). That rule has saved on many a log jam. I let students spray their hands with the sprayers and use the towels for drying if they insist on hand washing. I always emphasize personal responsibility in my classroom. The kids know that if I end up cleaning up their messes, we'll probably not repeat such messy activities. So far, so good.

Next week I plan on adding both white and black to the color selections and have the students explore tints and shades.

Sunday, November 8, 2009

Line Drawings

Finally. After getting sick and getting way behind, I'm nearly caught up with my classroom work. I've finally finished scanning the last of our line art drawings and have posted them on the web.

I love teaching art. I enjoy finding projects and seeing what the kids will do with the ideas. The first project we worked on this school year was line drawings based on art projects I saw on the excellent blog: Deep Sparkle. The drawings were actually finished about a month ago but I just finished scanning the last of the drawings. As I said in my last blog, getting sick put me way behind.

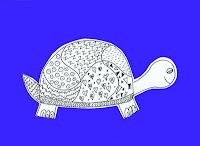
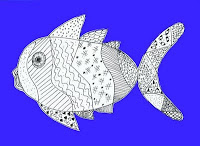
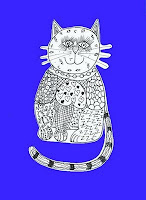
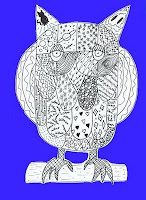
Line drawings are a good way to introduce and reinforce line and shape concepts. Through this activity, children learn a lot about the different types of line and shape, engage in planning, outlining, cutting and pasting, and mounting their projects. I followed the steps from Deep Sparkle's Turtle Drawings and Owls and Cats. All the project characters are modeled after these three ideas. You can see some student artwork here.

I modeled the outlines of each character for each grade level. I demonstrated how to create sections for each character and then together we brainstormed the many different line and shape types (geometric, organic, and free form). We make a huge chart of all possible lines and shapes we could use in our drawing. Students first drew with pencils and then outlined with thin Sharpie markers. All lines and shapes were drawn with markers only. Each section has to have the same line or shape within.

As with any art project/activity, this one touches on many of the art standards required by my State of Washington. When I return the art work to homeroom teachers, I try to include a list of those standards that were addressed. I include them here for those of you who might be interested. The project models below are teacher models.

1st grade turtles: Identifies and produces types of lines to create direction. Uses and produces horizontal, vertical, diagonal, curved, dotted, dashed, and zigzag lines to create shapes in an artwork.


2nd grade fish: Uses and produces different line qualities for a
variety of purposes. Uses and produces horizontal, vertical, diagonal, curved, dotted, dashed, and zigzag lines to create shapes in an artwork.


3rd grade cats: Produces different line types and line qualities to create detail in artwork. Uses and produces horizontal, vertical, diagonal, curved, zig-zag lines to create images. Uses lines to create patterns, designs, and textures in art.


4th grade owls: Produces different line types and line qualities to create detail in art work. Uses and produces horizontal, diagonal, curved, zig-zag lines to create a picture. Uses patterns, designs and textures and textures in art work.


5th grade: Produces different line types and line qualities to create detail in art work. Uses and produces horizontal, diagonal, curved, zig-zag, dashed, dotted, thick/thin lines to create a picture. Uses patterns, designs and textures and textures in art work.